Thursday, September 12, 2013

Over-Quilting?


No, we're not "over" quilting, as in finished.
Especially now that researchers in Scotland have found that quilting has health benefits that exercise can't give you - : D.
I mean "over-quilting", as in - to my own taste - over-doing it on one piece.

I see some amazing things, many  truly accomplished and spectacular  but I am also baffled by super heavily quilted pieces.
I always wonder - why?
I guess that's a silly question - one could ask Why? about all kinds of art. Maybe being Amazing is the sum total answer to Why.
Someone else might rightfully ask- Why Not?

But as for me,  minimalism is cool.


This is a finished snack mat/mug rug.
It is not "waiting to be quilted"; it is quilted, with an outline and 2 straight lines.I consider it  Done.
(The only other thing I might do here is some straight line stitching horizontally in the border fabric.
But not between every line.)  lol

If , like me, you quilt for fun, satisfaction, relaxation, and small (very small) profit, life is too short! I have a pretty hefty stash to plough through!!
I just want to make things. Lots of things. 
My rallying cry is: "Go to your studio and Make Something" .
Today.
Right now.
So - catch you later. 

But do weigh in with your own thoughts on the subject of over-quilting.


Monday, September 9, 2013

Joyful words from an almost 2-year old

With apologies to the non-grandmothers ( non-Mimi's) out there who couldn't care less about this topic - heh.

This past weekend at my daughter and son-in-law's house we heard my little granddaughter call this joyful message down from upstairs:
"I did it!!! I did it!!"
Yay! Good job!

In the meantime, here are some new items going into my studiozuzu etsy shop this week.


Thursday, August 15, 2013

Flag Finishes for Lac-Megantic

Edited Aug 17:

 I mailed these today.


First, I made the one that is second from the right - *then* read the directions more closely. I accidentally put batting into it where none is the requirement. Heh.
I was very happy to find a good way to use some of the quilt top I made with Aviary fabric awhile ago for the 3 other flags. Machined appliqued a batik heart on each one.
The backs of the flags are the same colour as the acidy-green ties. The outline of the hearts shows up nicely on the back too. Forgot to take a picture of them...

Original post:

Today I can report 4 finishes.


Similar to the To Boston With Love project, banner flags are being made to send to the Quebec town that was so horribly devastated by the railway accident a month ago.
Flags are being collected by [ courtepointeclaire.ca ], a sewing store in Laval.
Note: The deadline is  Saturday August 24th.  (I erred in a previous mention.)
They hope to have a display hung sometime in September.
I'll upload the pictures of my flags later; just wanted to add this link now, since I am a little late to the sew-in.


Wednesday, July 17, 2013

Fast & Easy HST's, 4 at a time

This is a fast fast easy easy way to make 4 half-square triangles in one go, with no fuss.

Place 2 squared fabric pieces right sides together and sew all around the square. My squares here are 9 X 9 inches.

quilting


Prepare to cut on the diagonal from corner to corner.


Be sure to align the ruler from stitched corner to corner.


Cut :)


Cut one of the triangles along the Red Line I photoshopped onto the picture. In real life, just use your ruler and cutting mat lines.


Open.

Repeat with the other triangle.
Open them all, finger-press or iron and arrange as desired , here as a pinwheel.


There - 4 fast and easy easy easy HST's with no fuss - no chain piecing, no drawing, no double line sewing.
:)


Friday, June 14, 2013

Translate the Translations and a Promise

I put the Translate box on this blog because I appreciated it in the past on other blogs I've visited.

But, having read some "translations" of other blogs yesterday and today, let me just say "Sorry" in advance for anything you may read here in translation.

Some translations were  funny - such as "pave the straight seam"; others were totally messed up and made no sense at all.

Why can't Google do a better job with translations? I do not know.

I Promise - for any projects I show in the future, I will use more photos and fewer words.

A bientot. 
Ciao. 
Bye for now.

P.s. - To be fair - I just translated this post into French, which I can read especially if I know what it's supposed to say :) - it wasn't perfect but I could certainly understand all of it; and into Italian - which I can only barely read - but it looked OK. 


Sunday, June 9, 2013

Fearless Hexies and first time Machine Applique

Hexagons, everywhere these days - including here now.
Way back when I first tried quilting - many many years ago - I tried to make a hexagon piece but bombed spectacularly.  It's haunted me since! (Not really, but sort of.) This time, I used 2 secret weapons.

After finding a template on line, I printed it then traced out a variety of hexagons, about 10, with no plan in mind. 


I then fearlessly (and somewhat  messily, I admit) used my first secret weapon spraying them with Easy-On Speed Starch which I got at Home Hardware for $4.29. A similar product in the big chain fabric store here cost $8.98 so yay me. 


I actually over-saturated the cut outs and they sat in a bubbly pool of white water on the back of one of my purple cutting mats. I finally put the dripping hexies on top of paper towels to dry, a bit.
After that I fearlessly eye-balled a 1/4 inch seam and began turning the edges down, finger pressing as I went along. Let me tell you - finger pressing sopping fabric is no picnic but I am impatient! I wanted some guideline before I used the (auxiliary) iron. Not using the Good Iron on these soppy, starched pieces.
As I ironed them the fabric began to dry. The seam took best for me when the fabric was about 50/50 wet/dry. The instructions say "damp or dry"


I cleaned up the mat using a paper towel - easy. 

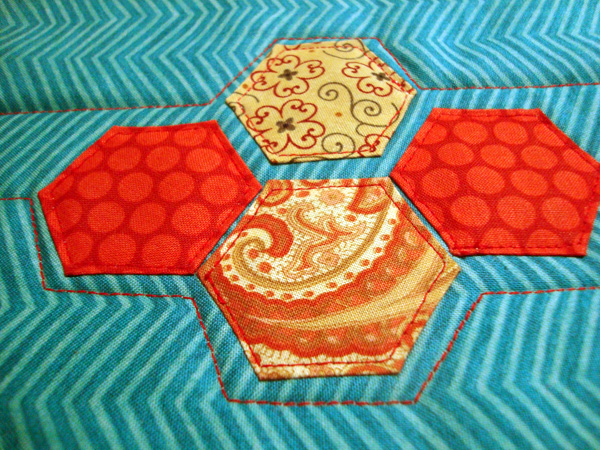
I decided to arrange a few hexies to make the top of a new pot holder/mug rug. And go Bold with the colour. This was my first venture into machine applique, again just eye-balling things not measuring.
I offset one hexagon for more design interest. And used my second secret weapon: to position the hexies without using pins for top stitching -


I dabbed this in the middle of each hexagon then sewed each one down. The Lapel Stick was bought at a quilt show but is probably available in stores or on line. I'll definitely be using it more in the future.

The finished applique.


I had the red thread in for the hexies and due to impatience - or laziness - I kept going with it onto the turquoise chevron background which had some natural design lines to follow.

Here's the finished mug rug. The actual colours are truest in the previous picture, the close up above this one.


I now feel fully cured of my hexagon haunting!

:D


Thursday, June 6, 2013

Best Laundry Days

The nicest kind of laundry - washing the new purchases - except for those pesky loose threads afterwards.
I've tried using a pinking blade and cutting off a corner on the diagonal - neither made that much difference for me.  Any suggestions?